使用sing-box搭建个人代理
sing-box 是由 SagerNet 团队开发的通用代理平台,既可以作为代理服务器(服务端),也可以作为代理客户端使用,支持 VLESS、VMess、Trojan、Shadowsocks、Hysteria2、TUIC 等多种协议。
sing-box官网:https://sing-box.sagernet.org/zh/installation/package-manager/
手动安装
该脚本从 GitHub 发布中下载并安装最新的软件包,适用于基于 deb 或 rpm 的 Linux 发行版、ArchLinux 和 OpenWrt。
curl -fsSL https://sing-box.app/install.sh | sh
一、核心命令一览
| 命令 | 用途 |
|---|---|
sing-box run | 启动服务(最常用) |
sing-box check | 检查配置文件是否有语法错误 |
sing-box format | 格式化配置文件(JSON 美化) |
sing-box merge | 合并多个配置文件 |
sing-box version | 查看版本号 |
sing-box generate | 生成辅助内容(如 UUID、密钥等) |
sing-box geoip / geosite | 管理 GeoIP/Geosite 数据库 |
sing-box rule-set | 管理规则集 |
二、基本使用流程
1.生成必需的密钥和参数
在你的服务器终端依次运行以下 3 个命令,把输出的结果保存下来(后面配置和客户端都要用):
# 1. 生成 UUID
sing-box generate uuid

# 2. 生成 REALITY 密钥对(包含 PrivateKey 和 PublicKey)
sing-box generate reality-keypair

# 3. 生成 Short ID (8位十六进制)
sing-box generate rand --hex 8
(假设你生成的参数如下,请替换为你自己生成的真实值)
UUID:
12345678-1234-1234-1234-1234567890ab
PrivateKey:i_am_private_key_xxxxx
PublicKey:i_am_public_key_xxxxx
Short ID:aabbccdd11223344
2.创建服务端配置文件
📖 创建配置目录和文件:
vim /etc/sing-box/config.json
# 1. 写入兼容 sing-box 1.13.0+ 的新版配置
cat > /etc/sing-box/config.json << 'EOF'
{
  "log": {
    "disabled": false,
    "level": "info",
    "timestamp": true
  },
  "inbounds": [
    {
      "type": "vless",
      "tag": "vless-reality-in",
      "listen": "::",
      "listen_port": 8443,
      "users": [
        {
          "uuid": "12345678-1234-1234-1234-1234567890ab",
          "flow": "xtls-rprx-vision"
        }
      ],
      "tls": {
        "enabled": true,
        "server_name": "www.apple.com",
        "reality": {
          "enabled": true,
          "handshake": {
            "server": "www.apple.com",
            "server_port": 443
          },
          "private_key": "i_am_public_key_xxxxx",
          "short_id": [
            "aabbccdd11223344"
          ]
        }
      }
    }
  ],
  "outbounds": [
    {
      "type": "direct",
      "tag": "direct"
    },
    {
      "type": "block",
      "tag": "block"
    }
  ],
  "route": {
    "rules": [
      {
        "action": "sniff"
      },
      {
        "action": "resolve"
      }
    ]
  }
}
EOF

# 2. 检查配置是否还有报错
echo "正在检查配置..."
sing-box check -c /etc/sing-box/config.json && echo "✅ 配置检查通过!没有任何错误!"

# 3. 重启服务使新配置生效
systemctl restart sing-box

# 4. 查看运行状态
systemctl status sing-box --no-pager
💡 提示:www.apple.com 是伪装目标(dest),你可以换成 www.microsoft.com、www.samsung.com 或 www.cloudflare.com,前提是服务器能顺畅访问该网站且该网站支持 TLS 1.3。
📖 启动并设置开机自启:
systemctl daemon-reload
systemctl enable sing-box
systemctl start sing-box
📖 查看运行状态(看到绿色的 active (running) 即代表成功):
systemctl status sing-box
📖 放行端口(非常重要)
ufw allow 8443/tcp # 或 firewall-cmd --permanent --add-port=8443/tcp && firewall-cmd --reload
3.客户端添加
🚌 支持vless协议可以直接导入
vless://<替换为你的UUID>@你的服务器公网IP:8443?encryption=none&flow=xtls-rprx-vision&security=reality&sni=www.apple.com&fp=chrome&pbk=<替换为你的PublicKey>&sid=<替换为你的ShortID>&type=tcp&headerType=none#My-Server
(注意:PublicKey 和 UUID 如果包含特殊字符,可能需要 URL 编码,建议直接用客户端手动填表或扫码)
服务端搭建完毕!现在你需要将以下参数填入你的客户端(如 v2rayN、NekoBox、sing-box、Clash.Meta、Hiddify 等):
| 参数名称 | 填入的值 |
|---|---|
| 协议 (Type) | VLESS |
| 地址 (Address/IP) | 你的服务器公网IP |
| 端口 (Port) | 443 |
| UUID | 第一步生成的 UUID |
| Flow (流控) | xtls-rprx-vision |
| 加密 (Encryption) | none |
| 传输层安全 (TLS) | reality |
| SNI (ServerName) | www.apple.com (与配置文件一致) |
| Public Key (公钥) | 第一步生成的 PublicKey |
| Short ID | 第一步生成的 ShortID |
| Fingerprint (指纹) | chrome (或 firefox/safari) |
🚌 使用yaml格式的本地文件导入
创建 clash.yaml文件
# Clash Meta (mihomo) 最终修复版配置
mixed-port: 7890
allow-lan: false
mode: rule
log-level: info
unified-delay: true
tcp-concurrent: true

geodata-loader: standard
auto-redir:
  enable: false

profile:
  store-selected: true
  store-fake-ip: true

# 修复点:删除了 HTTPS,只保留 HTTP, TLS, QUIC
sniffer:
  enable: true
  sniff:
    HTTP:
      ports: [80, 8080]
    TLS:
      ports: [443, 8443]
    QUIC:
      ports: [443, 8443]

geodata-mode: true
geosite:
  path: ./geosite.dat
geoip:
  path: ./geoip.dat
find-process-mode: strict

proxies:
  - name: "🚀 My-sing-box-Server"
    type: vless
    server: 103.112.184.19
    port: 8443
    uuid: <替换为你的UUID>
    network: tcp
    tls: true
    udp: true
    flow: xtls-rprx-vision
    servername: www.apple.com
    reality-opts:
      public-key: <替换为你的PublicKey>
      short-id: <替换为你的ShortID>
    client-fingerprint: chrome

proxy-groups:
  - name: "🎯 节点选择"
    type: select
    proxies:
      - 🚀 My-sing-box-Server
      - DIRECT

rules:
  - GEOIP,CN,DIRECT
  - GEOSITE,cn,DIRECT
  - MATCH,🎯 节点选择
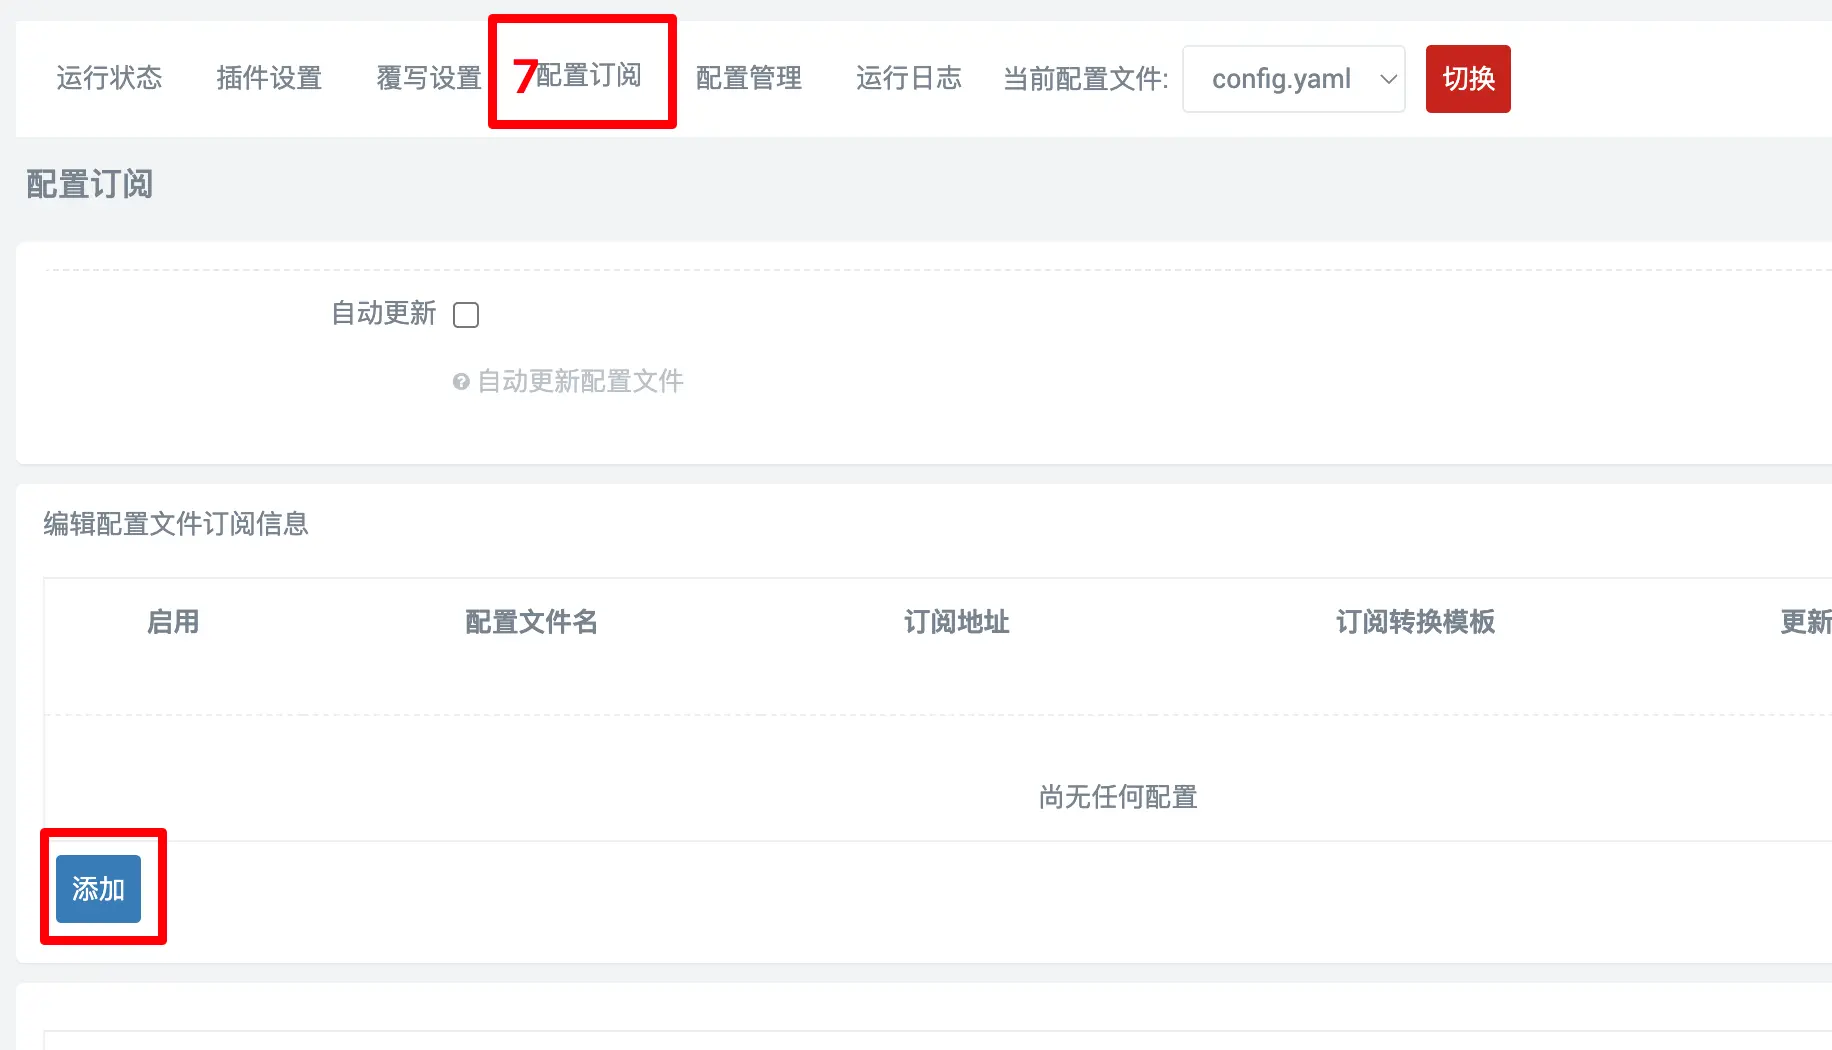
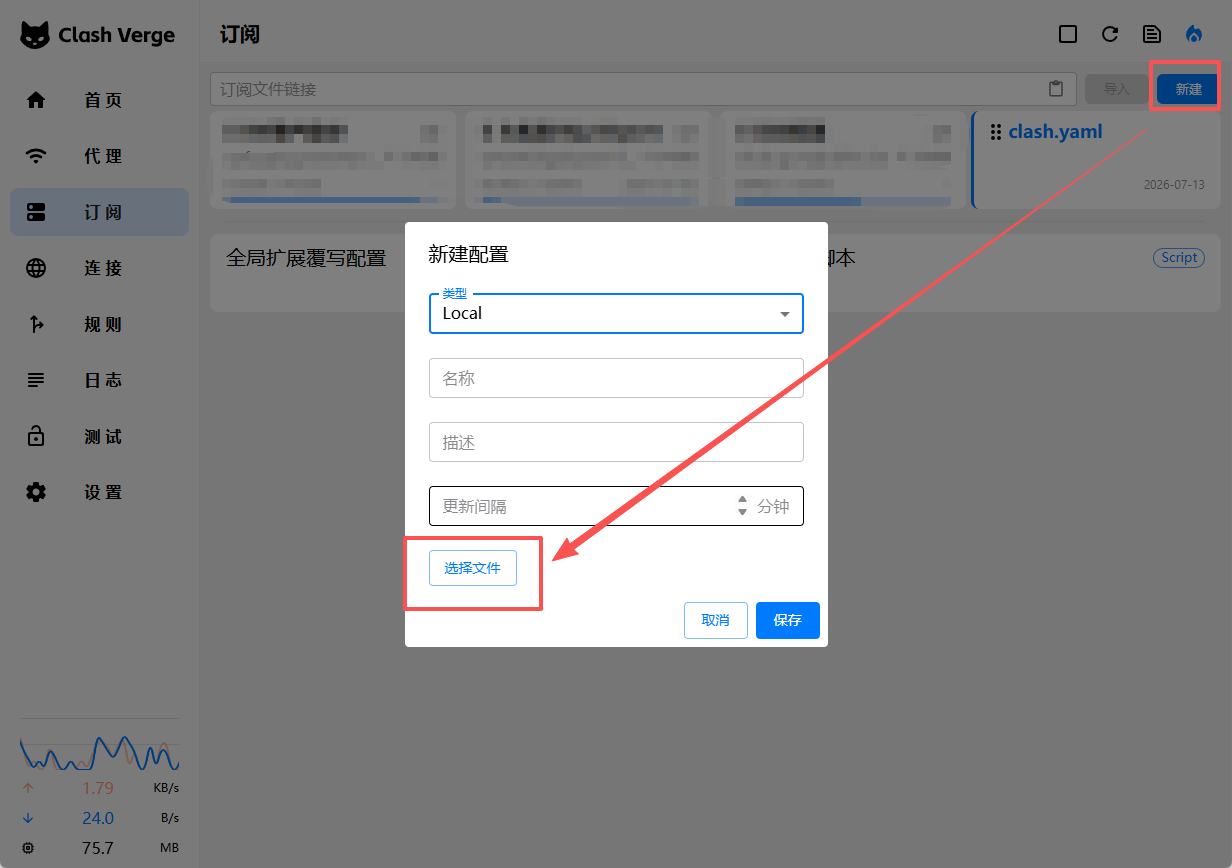
选择文件导入即可
🚌 OpenWrt Clash使用
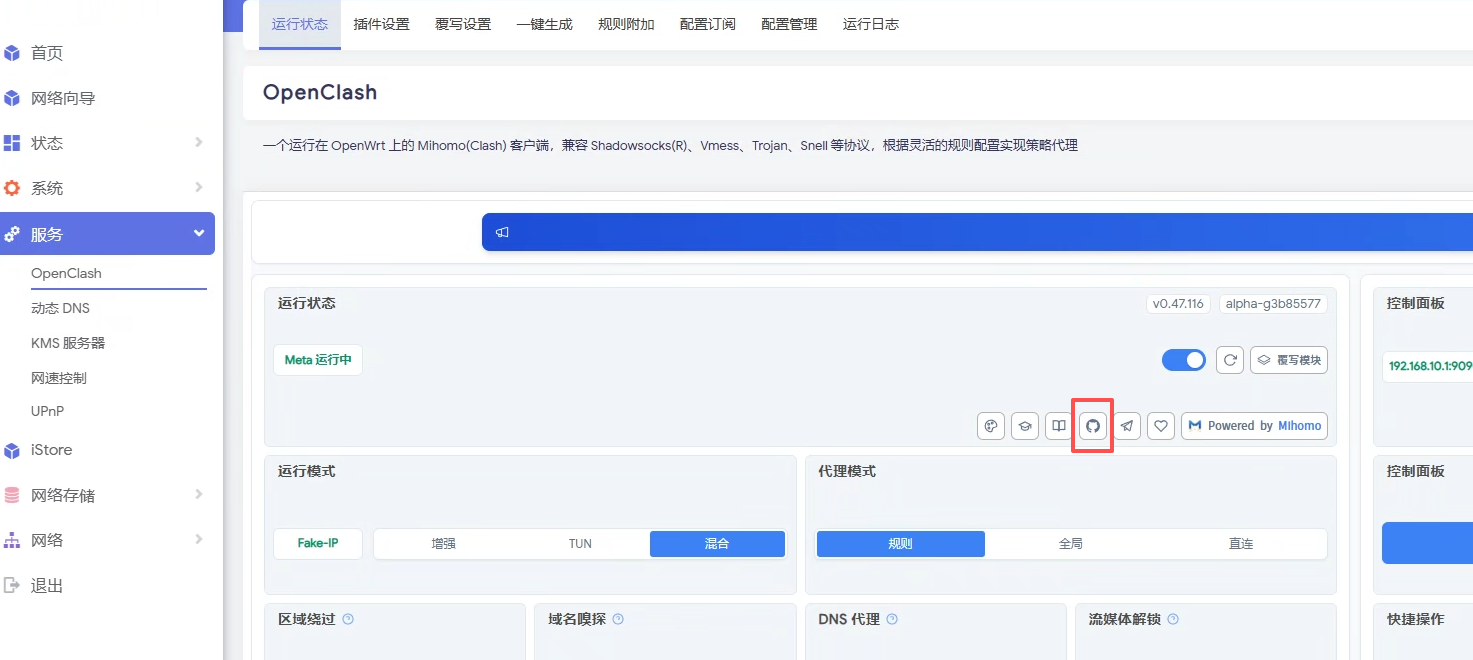
1.升级Open Clash
点击图片中的按钮到官方GitHub界面,或者使用 https://github.com/vernesong/OpenClash/releases 地址下载
下载对应版本安装包,我的是路由器,所以选择 ipk安装包
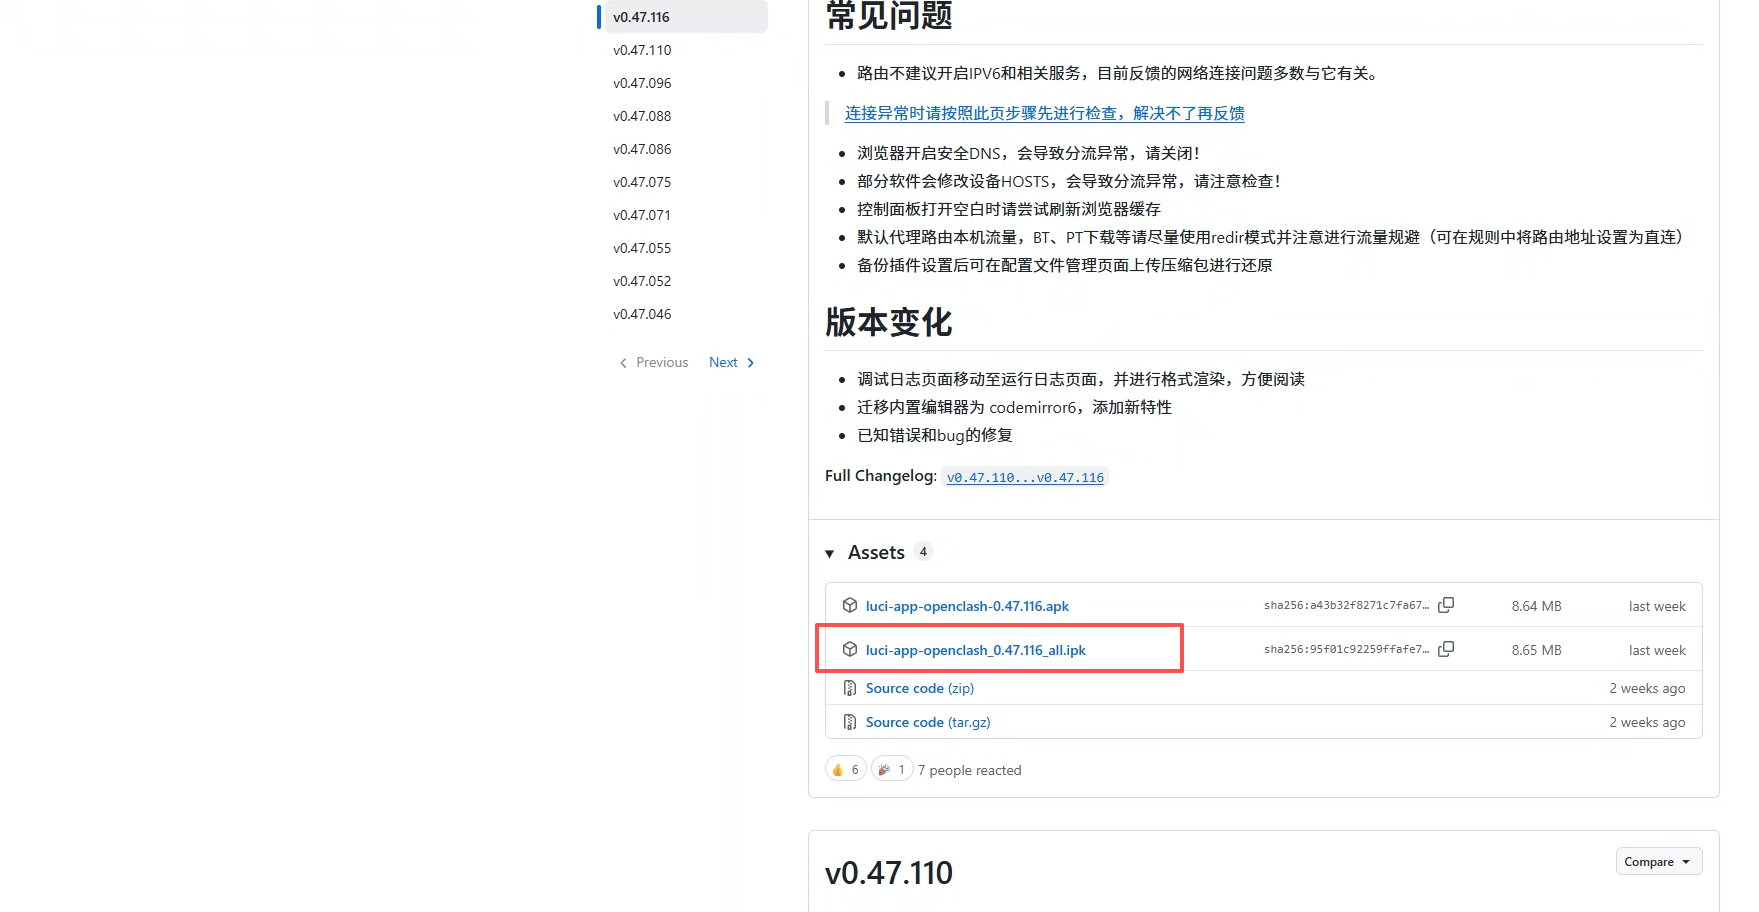
ssh到路由器,复制安装包到路由器,执行 opkg install luci-app-openclash_0.47.116_all.ipk
安装完毕后刷新OpenClash就能看到更新了
下载GeoIP.dat和Geosite.dat
https://github.com/MetaCubeX/meta-rules-dat/releases/download/latest/geoip.dat
https://github.com/MetaCubeX/meta-rules-dat/releases/download/latest/geosite.dat
下载完成后上传到路由器/etc/openclash/并重命名
mv geoip.dat /etc/openclash/Geoip.dat
mv geosite.dat /etc/openclash/Geosite.dat
2.设置Open Clash可用(需要重新整理)
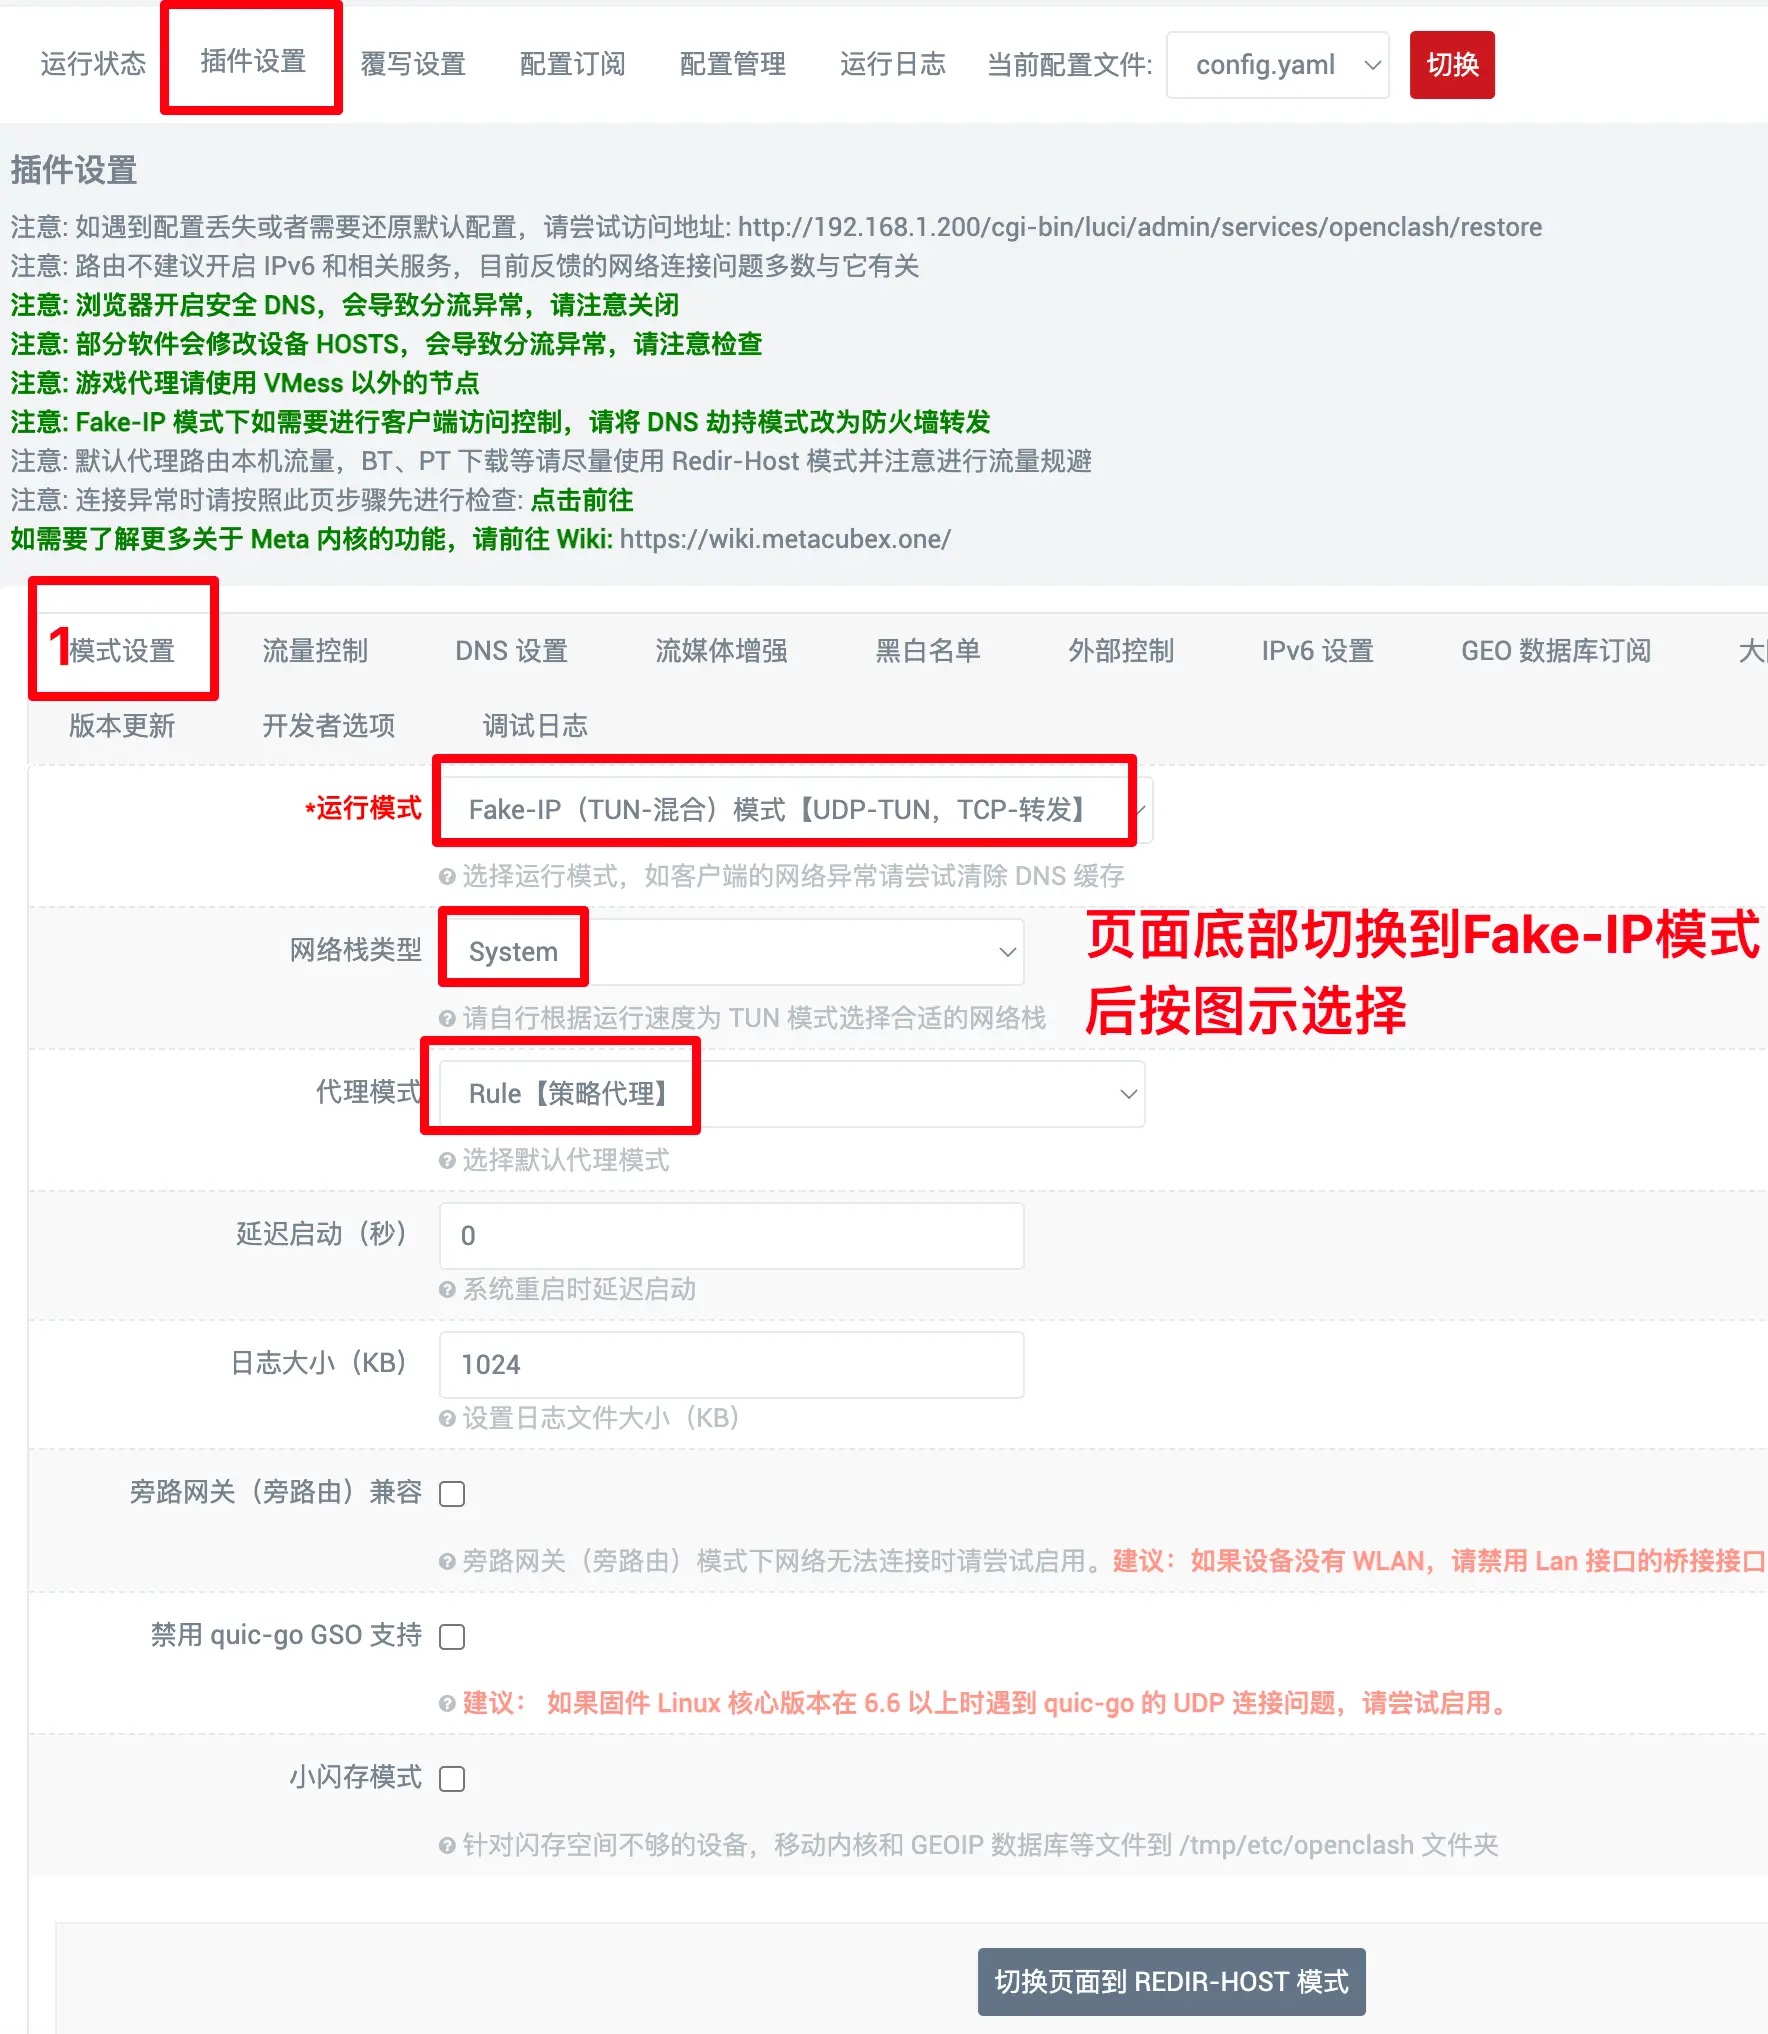
✈️ 在菜单中打开Openclash,在“插件设置”的“模式设置”中,下拉到页面中部点击“切换到Fake-IP模式”
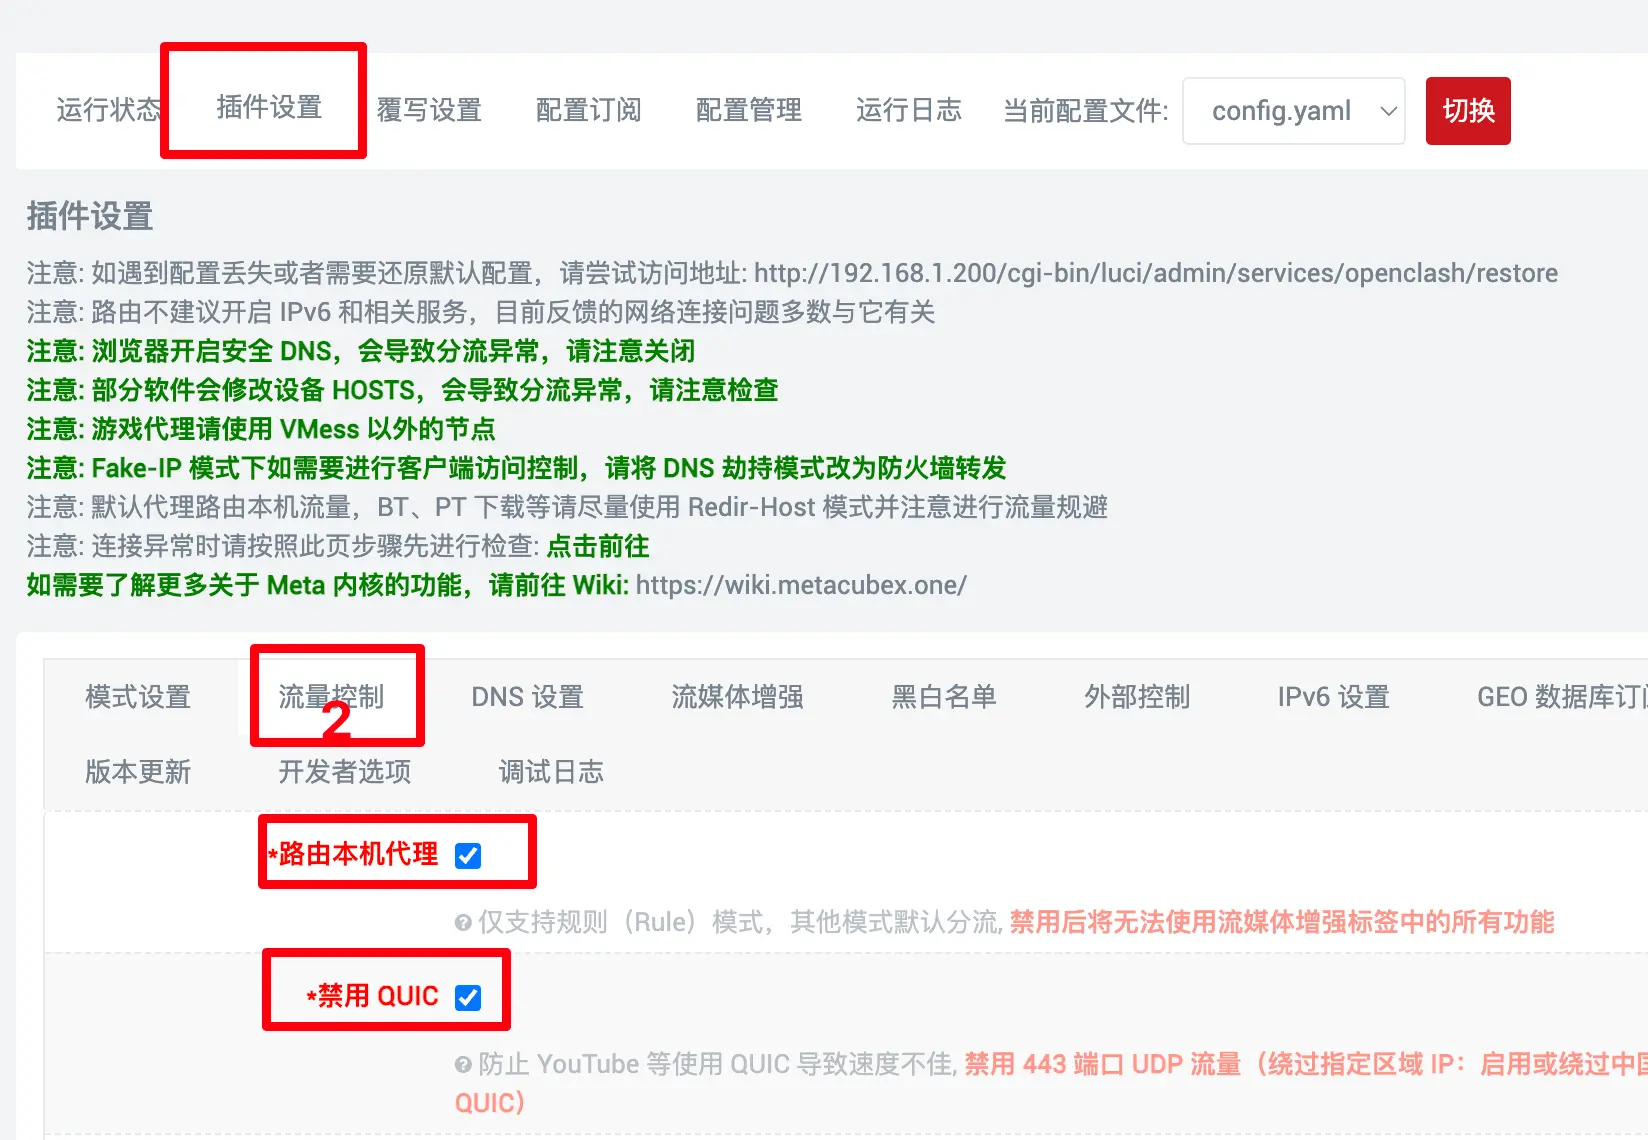
流量控制
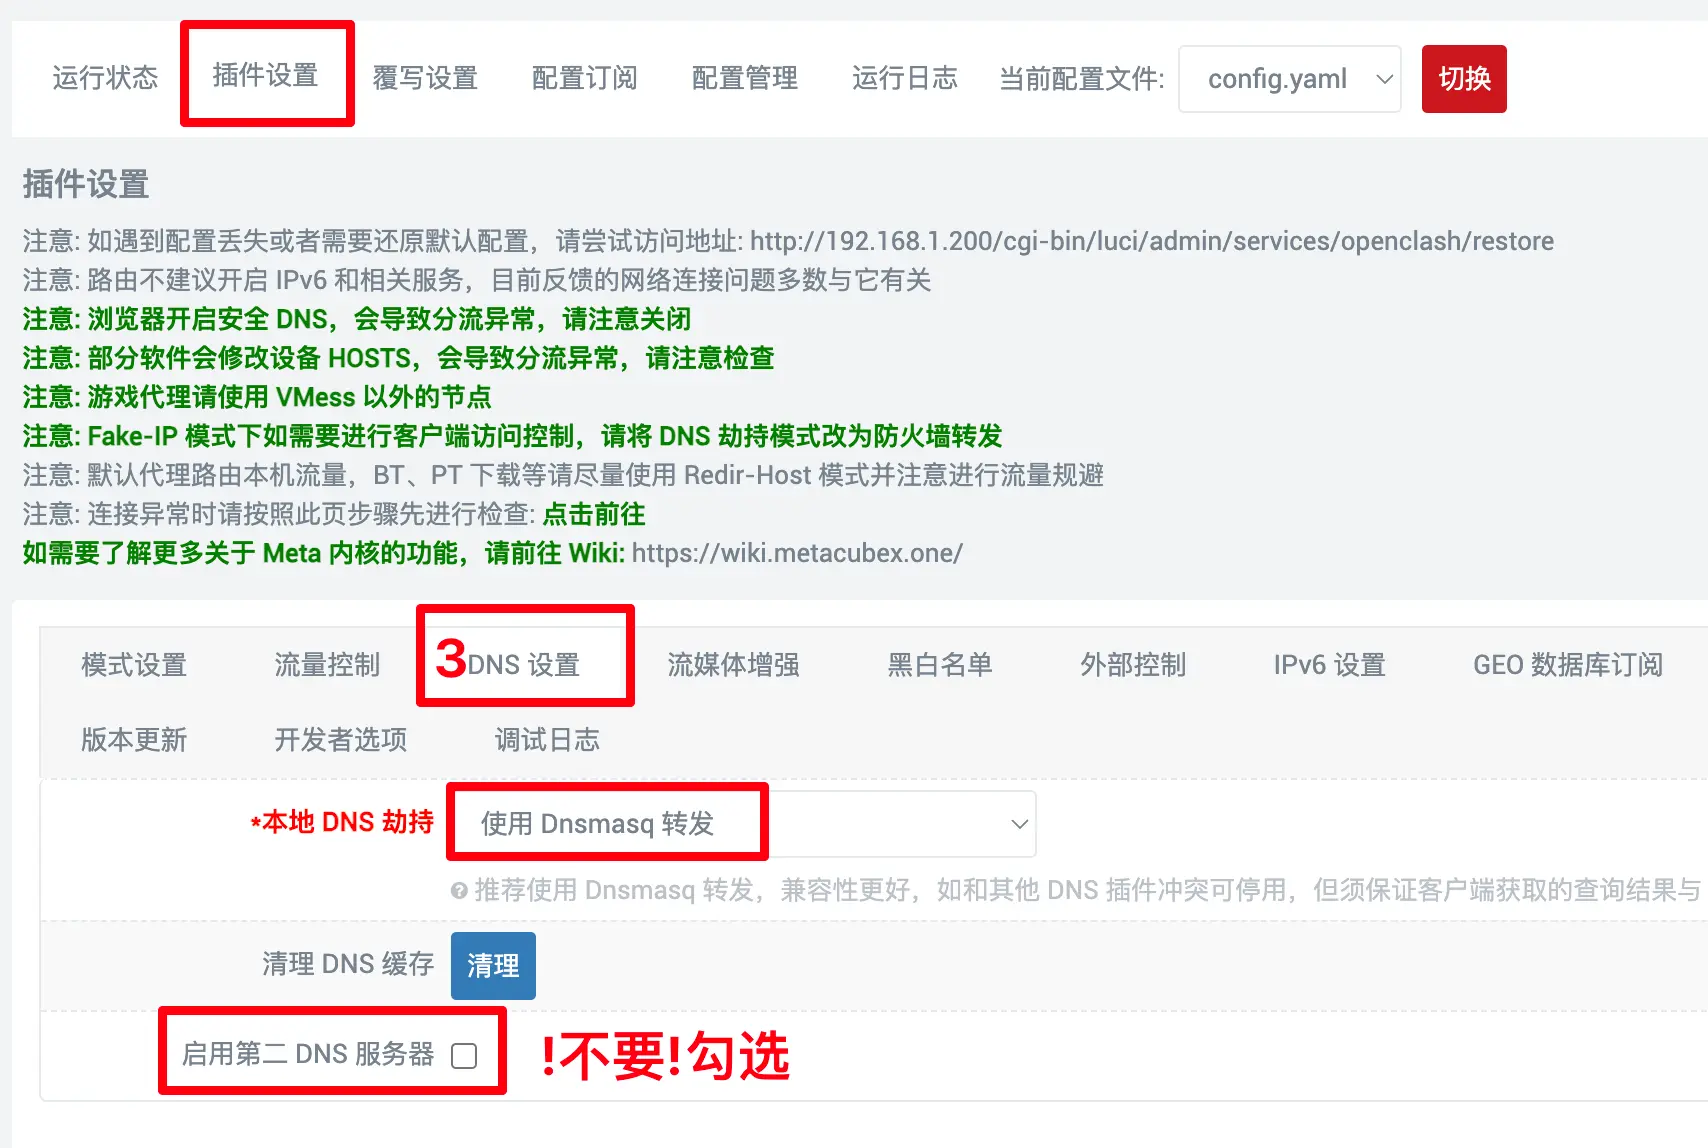
DNS设置
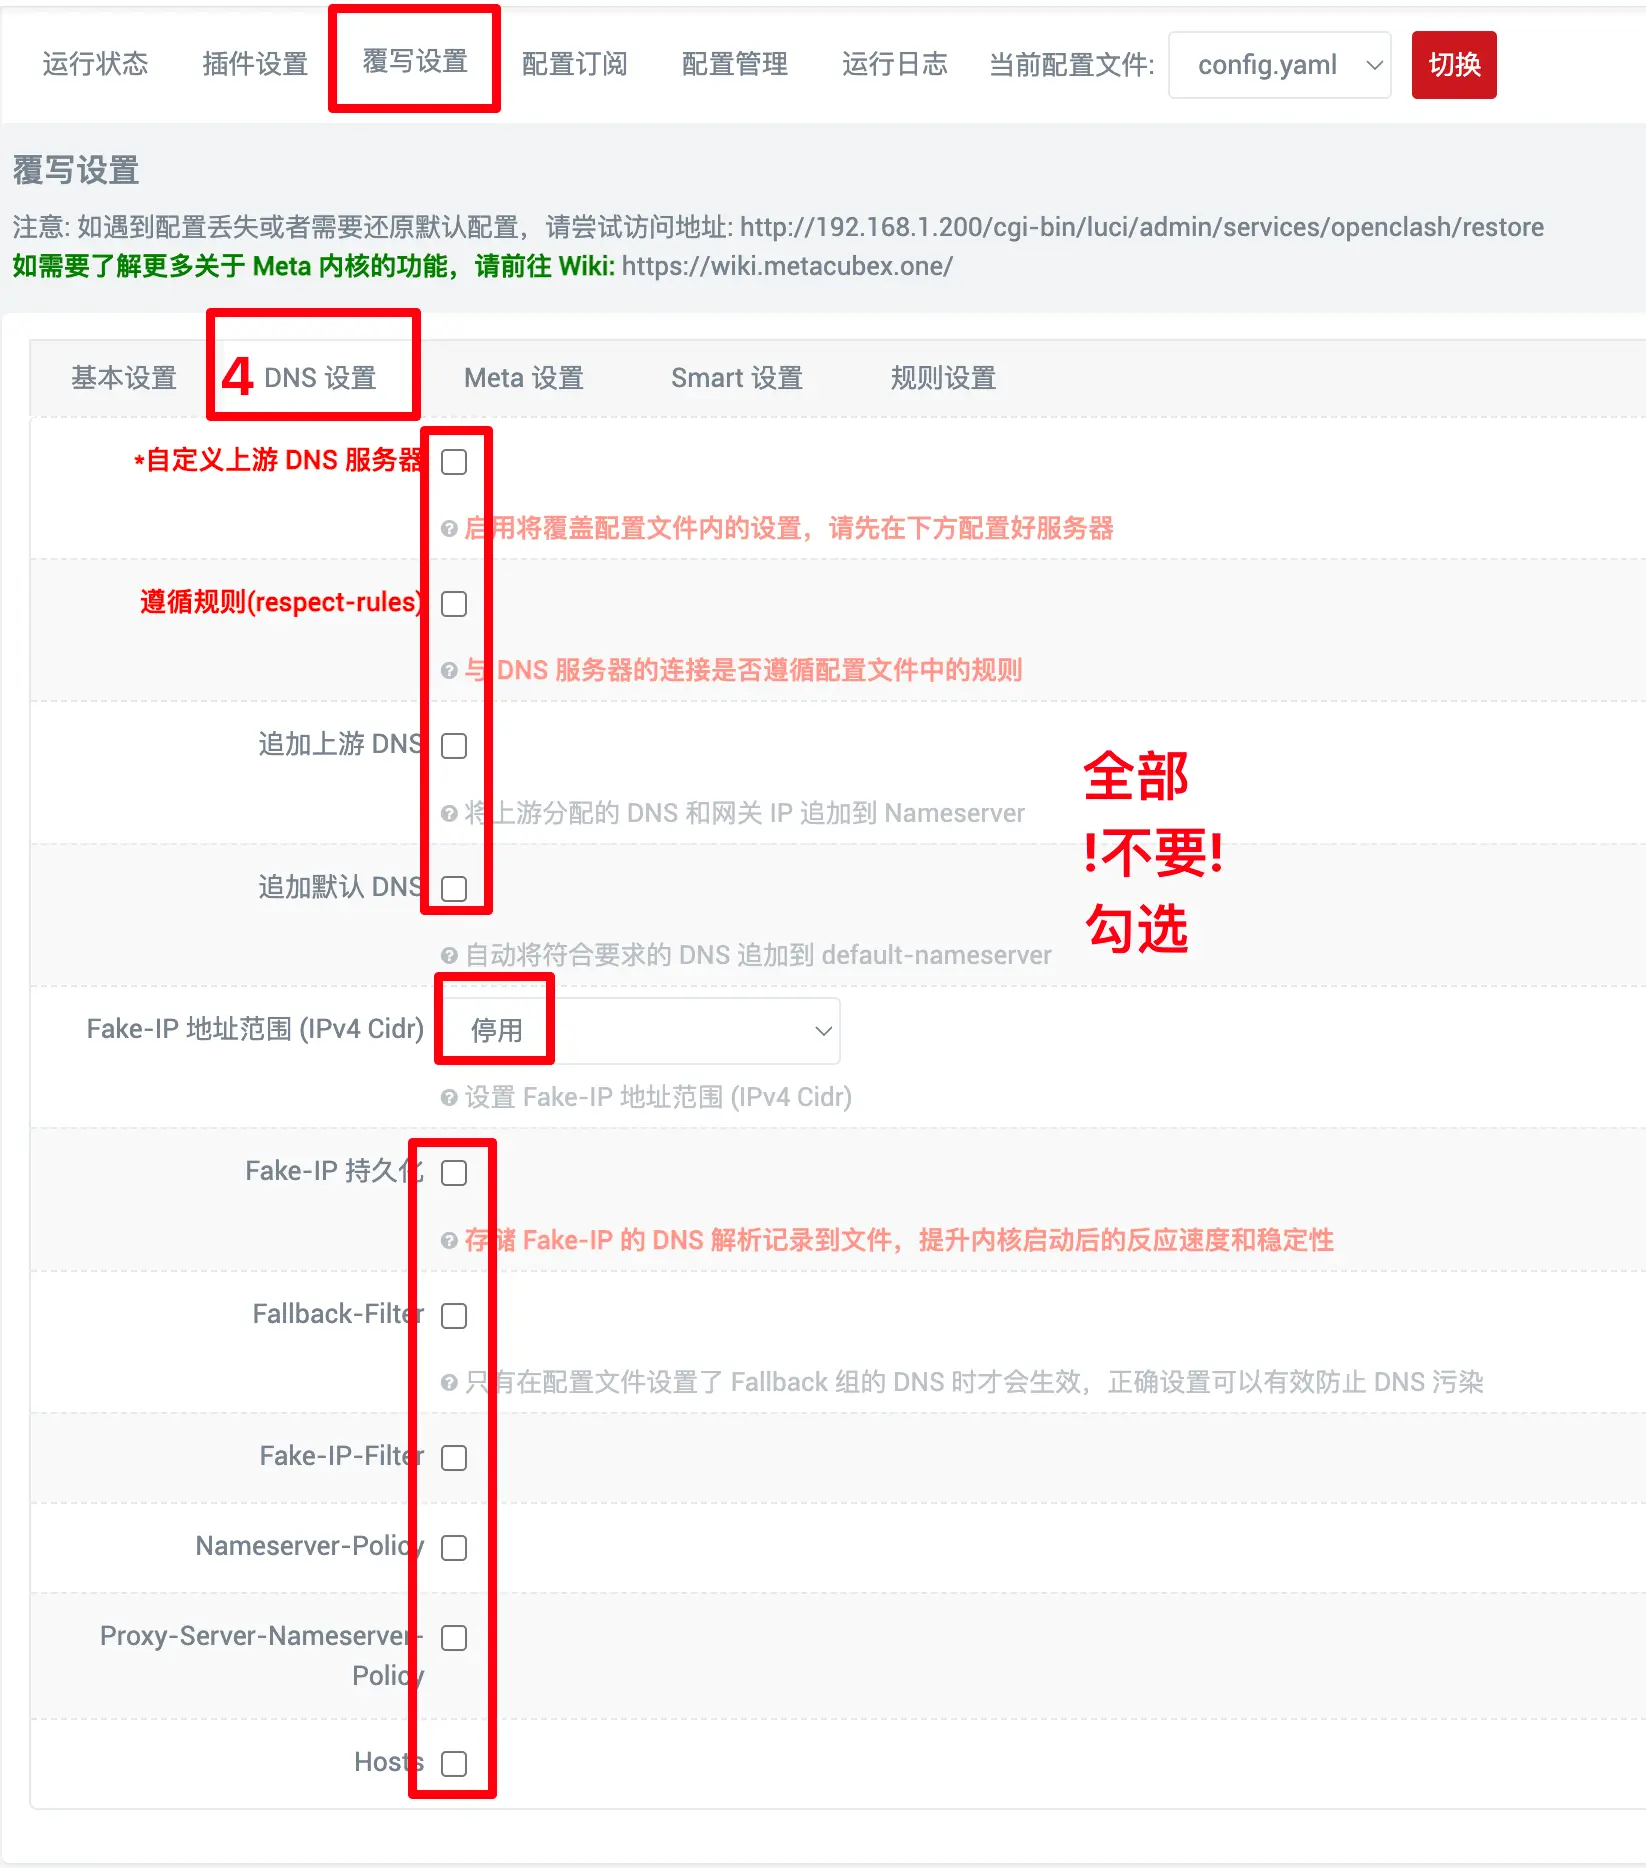
覆写设置 DNS 设置
Meta 设置
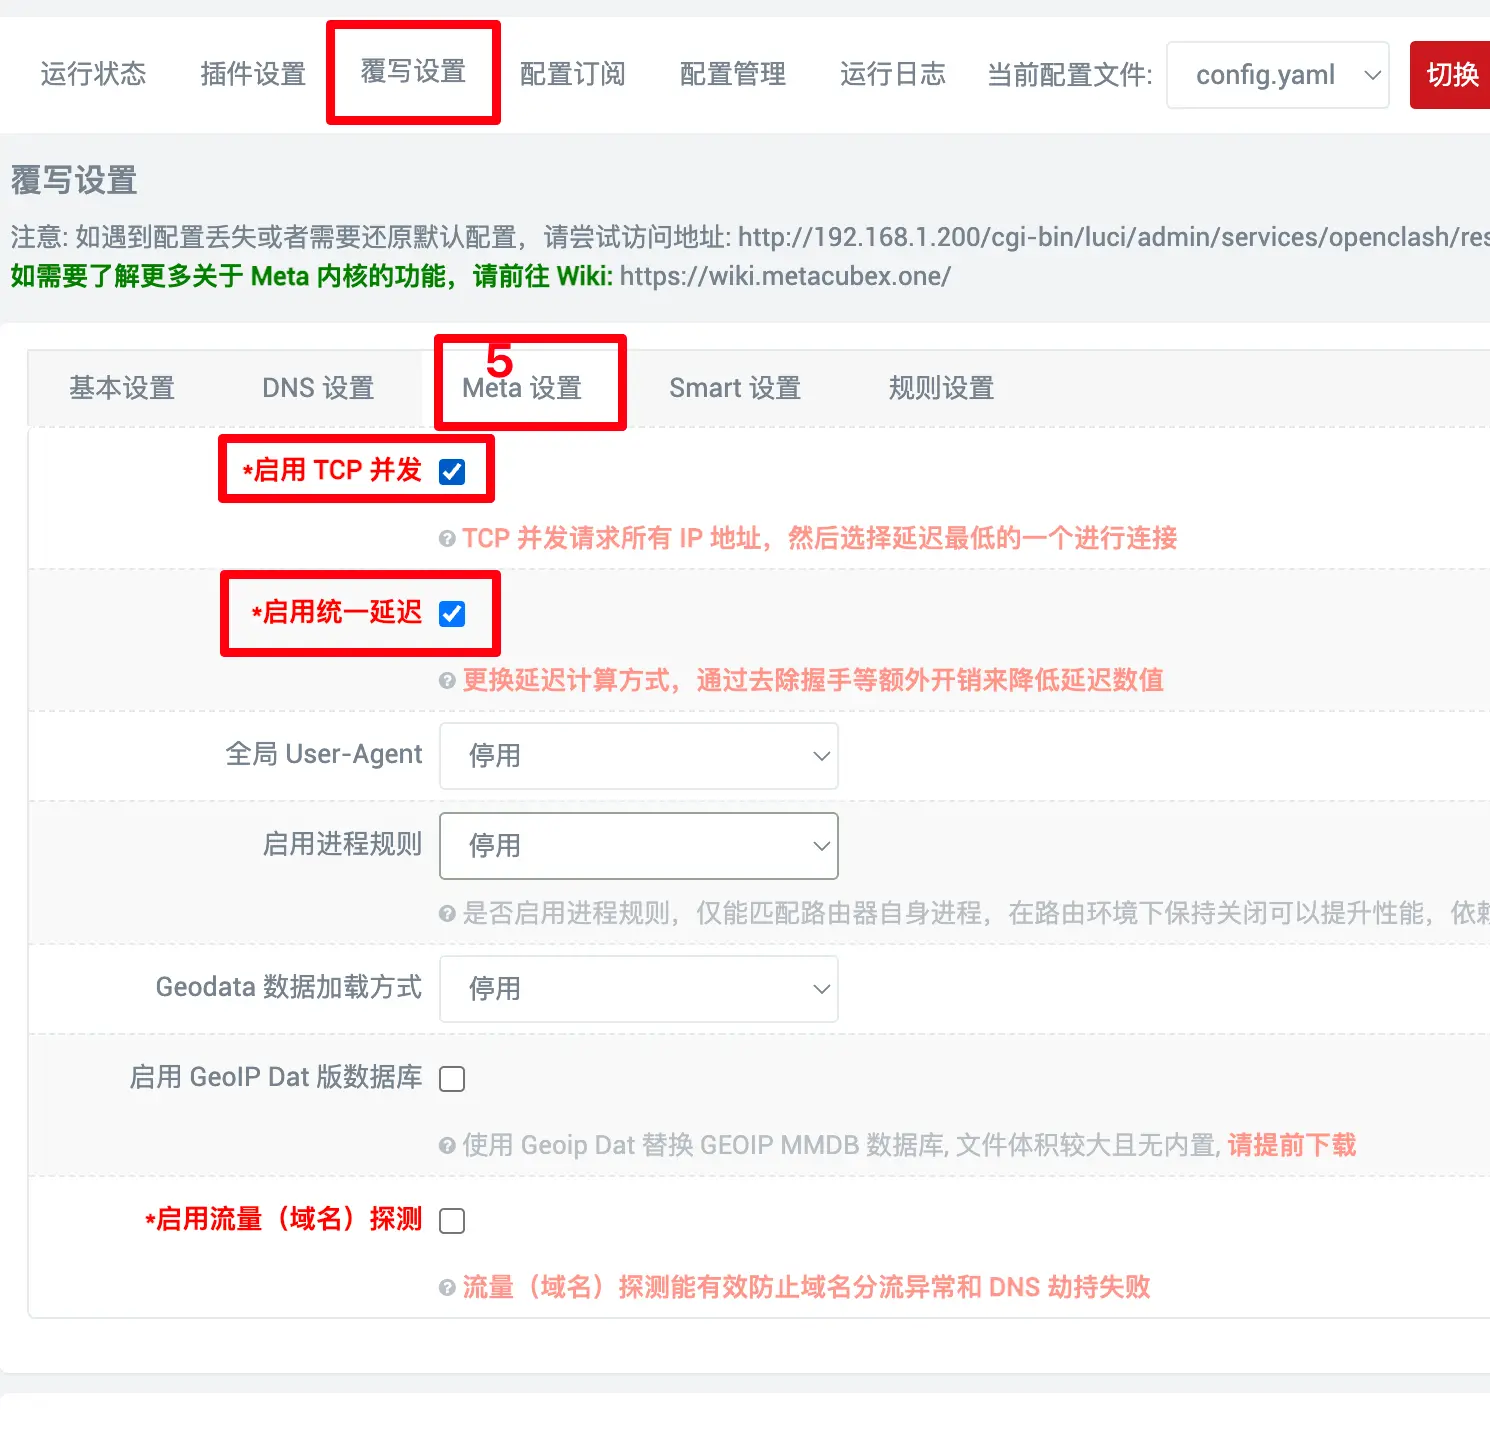
规则设置
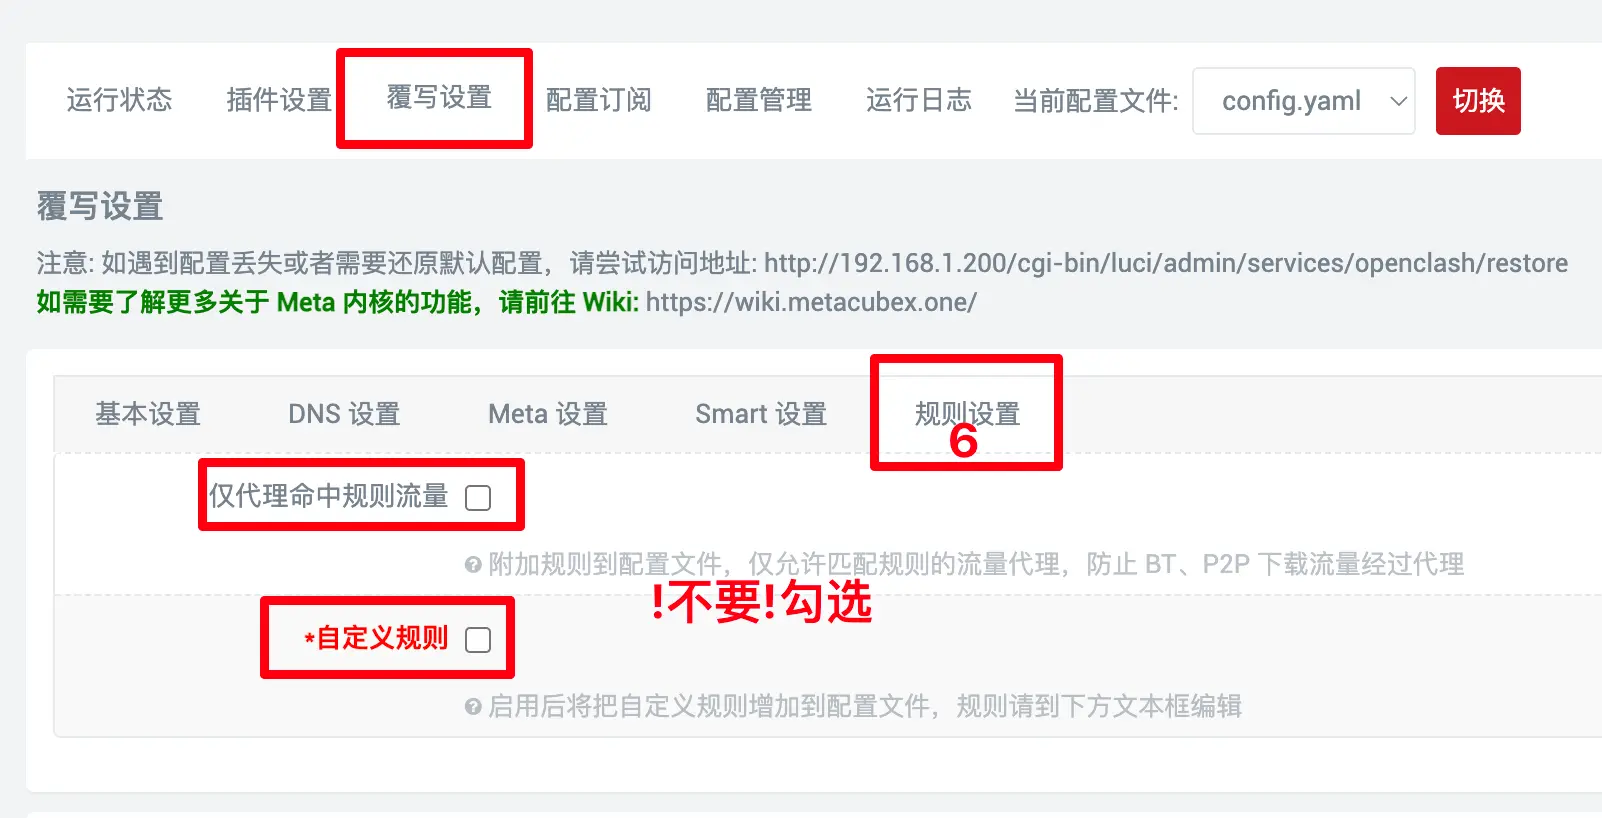
配置订阅,开始导入配置